
Blog
CM2200/ CX331/ CX431 Scan to PC by Network

CM2200/ CX331/ CX431 Network scanning method
Applicable models: Pantum CM2200FDW / Lexmark CX331/ Lexmark CX431
- How to use the network scan function?
- Make sure the printer is connected to a wired or wireless network. After success, the top of the printer screen will prompt the printer “IP Address (usually 192.168.x.xxx).”
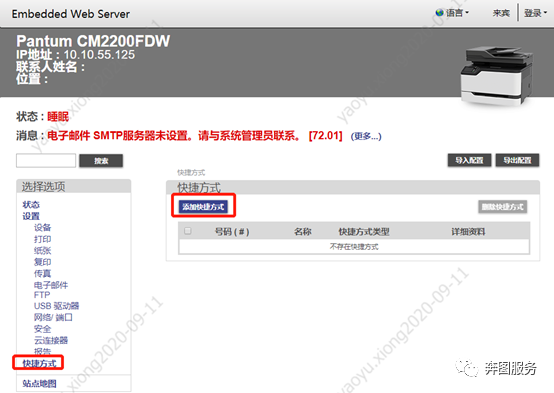
- Open the Web Browser (the computer MUST be in the same local area network as the printer) , enter the “IP address of the printer” in the address bar, and enter the printer “Embedded Web Server”.
- Click the shortcut on the left and select Add shortcut.
- Operation details:
- Set the application name:
Click the shortcut type: select a network folder; edit the shortcut name to a familiar or commonly used name (it will be displayed on the main screen after creation); enter a digit from 0 to 99 in the shortcut number for the shortcut Numbering.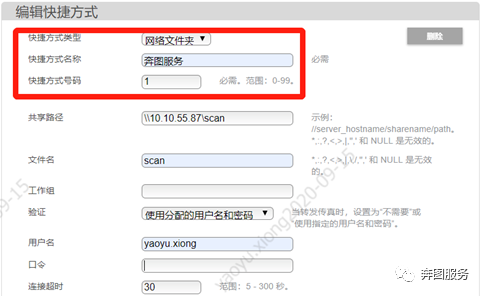
- Shared path and file name:
Create a folder on the computer that needs to use network scanning and enable the sharing function to receive files from the printer; set the sharing permission, and set it in the sharing path of the printer’s webpage after the creation is complete. The corresponding address and file name. Example: Now the known conditions are that the computer IP address is 10.10.55.xx, and the printer IP address is 10.10.55.xxx- Create a new folder on the computer, name it to scan, right-click and open Properties.
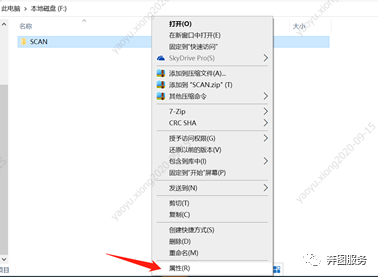
- Create a new folder on the computer, name it to scan, right-click and open Properties.
- Set the application name:
b) Select “Sharing” and click “Advanced Sharing“;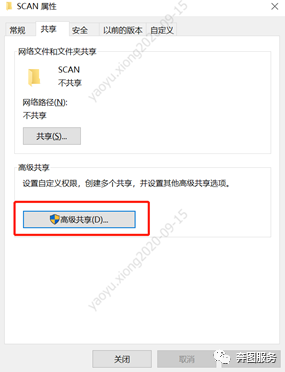
Check “Share this folder”, click “Permissions”, and check “Full Control” in “Permissions for Everyone”.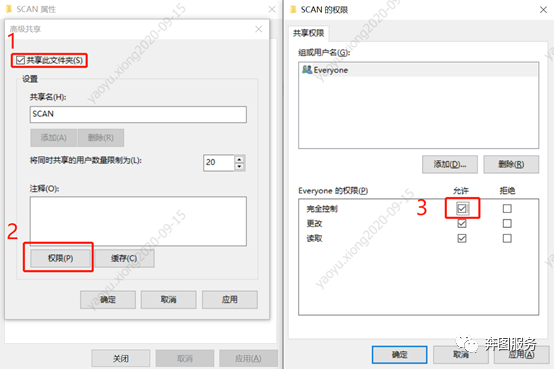
c) Enter the IP address of the Network Folder: example, “\\10.10.55.xx\scan” in the shared path; And set “Folder Name” can be set according to your own needs.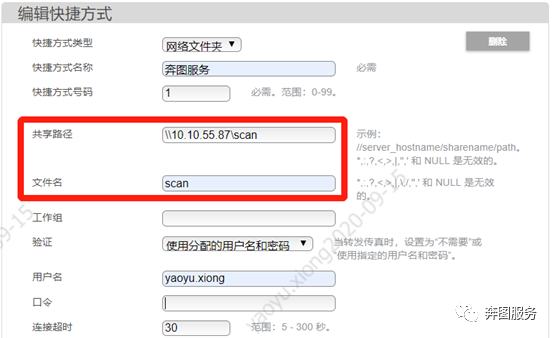
Verify:
After selecting “Use the assigned user name and password” in the authentication drop-down column, fill in the “user name and password” for logging in to the computer in the user name column.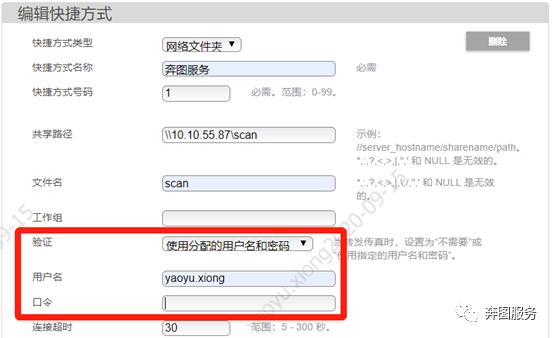
That’s all for the printer background settings. If you still have problems with this setting, please create a Support Ticket to us.
Also, we can provide a Professional Setup for the our printer. For detail, please check our Remote Installation Service.


